
How to Add Mapbox to Build a CMS Map in Webflow [Complete Guide]
.avif)
This comprehensive guide explores the advantages of using Mapbox over Google Maps in Webflow for creating interactive, CMS-powered maps. It highlights the superior customization, performance, and cost-effectiveness of Mapbox, and provides a step-by-step guide on integrating Mapbox with Webflow using the Dynamic Map app. The guide also discusses the limitations of Webflow's default Google Maps element and showcases real-world use cases for dynamic, CMS-driven maps.
Learn how to use Mapbox to build interactive CMS Maps in Webflow
Building interactive maps connected to your Webflow CMS using Mapbox offers superior customization, performance, and cost-effectiveness compared to traditional mapping solutions. Although Webflow does natively only supports using Google Maps, Dynamic Map for Webflow bridges that gap bringing Mapbox’s powerful capabilities directly into your Webflow projects.
In this comprehensive guide, we’ll explore why Mapbox is fast becoming the preferred choice for modern web applications, and how to create stunning, CMS-powered Mapbox maps in Webflow—no coding required.
What You’ll Learn:
- Why Mapbox offers superior customization and performance compared to Google Maps
- The three key advantages that make Mapbox ideal for modern web applications
- How to build a scalable, CMS-connected Mapbox integration using the Dynamic Map App
Why Choose Mapbox Over Google Maps in Webflow
Mapbox has emerged as the maps integration platform of choice for modern web applications, powering everything from ride-sharing apps to real estate platforms. Unlike traditional mapping solutions, Mapbox offers unprecedented customization control, transparent pricing, and superior performance.
What Makes Mapbox Different:
- Complete visual control over map styling and appearance
- Transparent, predictable pricing structure
- Superior performance with faster loading times
- Advanced data visualization capabilities
- Developer-friendly API and extensive customization options
Who Uses Mapbox: Major platforms like Shopify, Airbnb, The New York Times, and thousands of modern web applications have chosen Mapbox for its flexibility and performance advantages.
However, implementing Mapbox in Webflow traditionally required complex custom coding and technical expertise. Dynamic Map for Webflow eliminates this barrier, bringing Mapbox's power directly into Webflow's visual environment.
Why you should not use Webflow's default Maps element

Webflow offers a built-in Google Maps element, providing a simple way to embed Google Maps directly into your website. Powered by the Google Maps JavaScript API, it delivers basic functionality that’s ideal for straightforward, single-location use cases.
What Webflow’s default Google Maps element offers:
- Interactive Google Maps integration with one location
- Four map types: roadmap, terrain, satellite, and hybrid
- Basic zoom and pan controls
- Address-based location input
The Three Critical Limitations of Webflow's default Google Maps element
While Webflow’s native Google Maps element is fine for basic use cases, it has three major limitations that make it unsuitable for most business applications:
Limitation #1: Only Single Location Support
The Problem: Webflow’s map element supports only one location pin per map. You can add multiple map elements to a page, but each one must be configured manually.
Limitation #2: No CMS Connection
The Problem: The native Google Maps element doesn’t integrate with CMS Collections. Every location has to be entered manually into each map.
Limitation #3: Severely Limited Styling and Customization
The Problem: Native Webflow maps offer only minimal customization options. You're stuck with Google's default map styling, standard location markers, and no interactions such as pop-up windows or tooltips.
Create CMS Maps with Mapbox using Dynamic Map for Webflow


Dynamic Map is a native Webflow app designed to help you build fully interactive, CMS-driven maps—complete with location markers, pop-ups, advanced filters, and more. Rather than working around the limitations of Webflow’s built-in map element, Dynamic Map offers a dedicated, seamless solution for creating sophisticated Google Maps integrations directly within Webflow.
Key Features of Dynamic Map for Webflow
Seamless CMS Integration
- Link your map directly to Webflow CMS collections
- Show as many location pins as needed from your dynamic content
- Maps update automatically when CMS items are added or changed
- Keeps your map in sync with your CMS in real time
Flexible Design Options
- Tailor map styling to reflect your brand identity
- Use custom icons and personalized pin designs
- Add detailed pop-ups with formatted text, images, and links
- Choose from various map themes and color palettes, compatible with both Google Maps and Mapbox
Engaging User Interactions
- Enable users to search and filter locations with ease
- Display unlimited map items without performance loss
- Define custom zoom levels and map boundaries
- Optimized for smooth, touch-friendly navigation on mobile devices
Connect Dynamic Map with Mapbox in Webflow
Dynamic Map is a fully native Webflow app, built to fit right into your current design and development process. In this step-by-step guide, you’ll discover how to set up an interactive, CMS-powered map using Mapbox on your Webflow site – in just six simple steps:

1. Set up your CMS Collection List
Include text fields for the item’s name, latitude and and longitude fields

2 Install Dynamic Map App from Webflow’s App Marketplace
Just browse Webflow's Marketplace or open from the App Panel in Webflow's designer

3 Connect your CMS collection list and create map
Select the collection list containing your location data

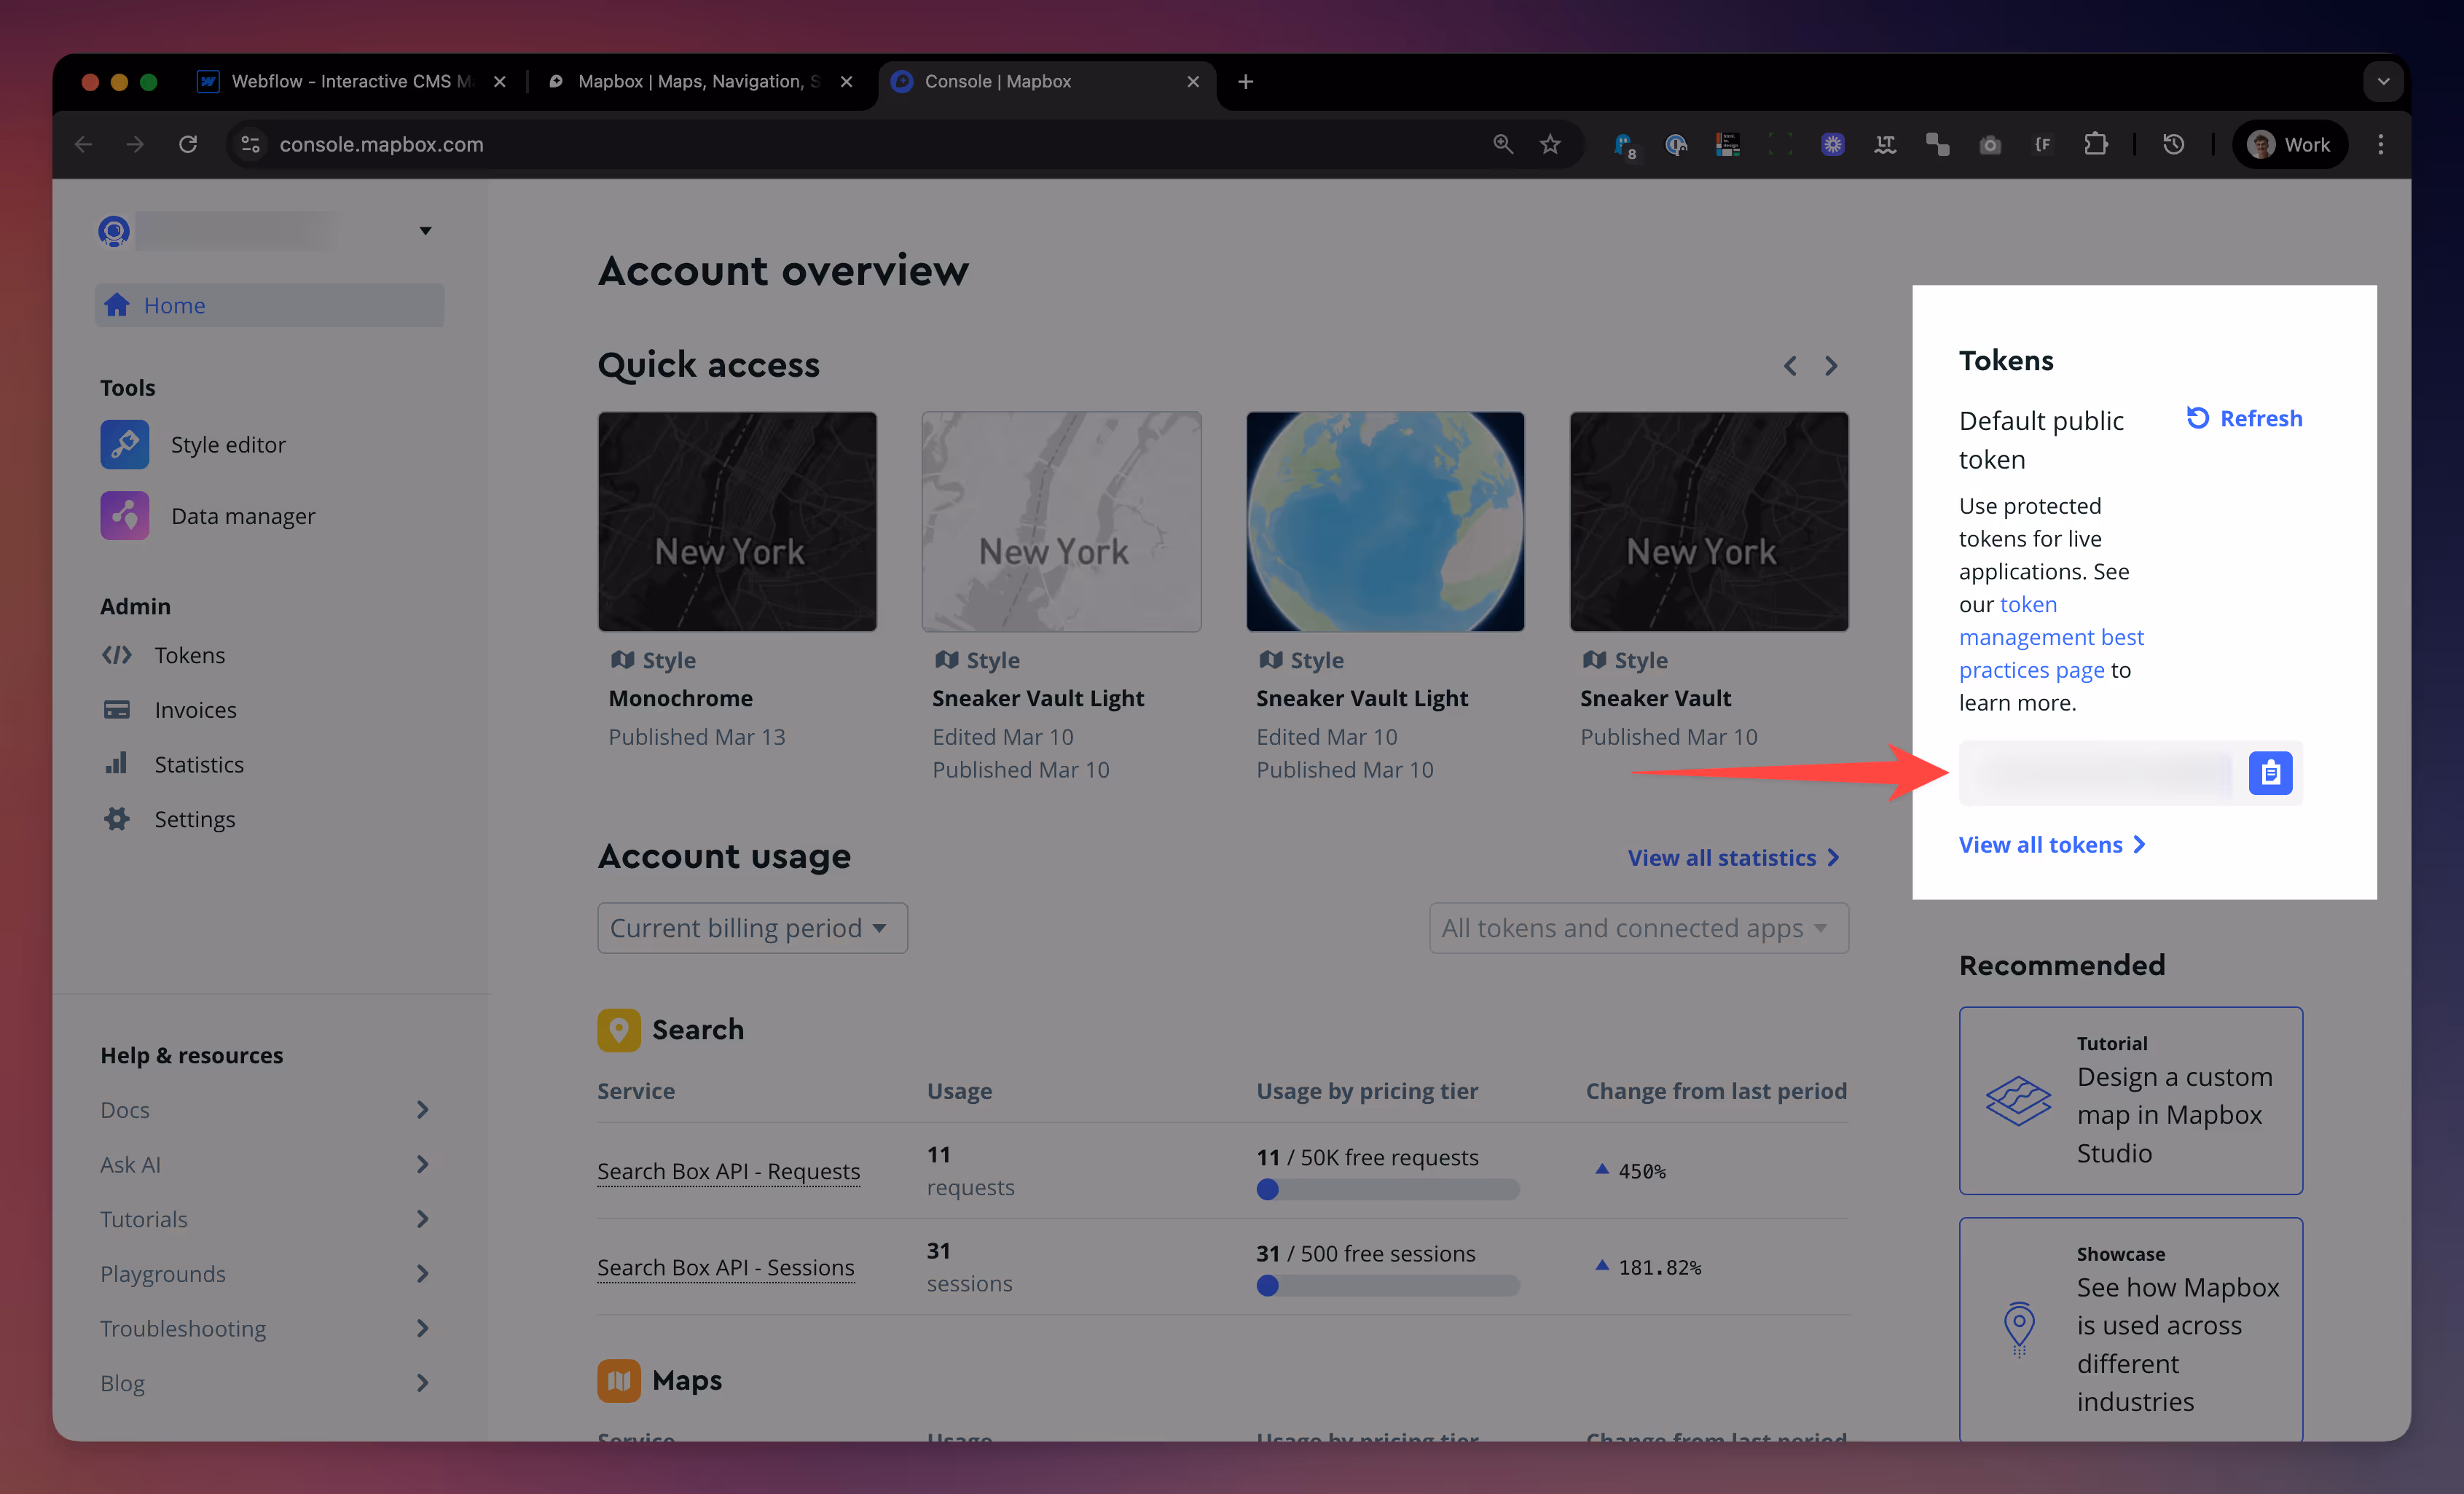
4 Switch to Mapbox as your map provider and insert your access token
By default Mapbox style token is set to its default "Streets" map theme

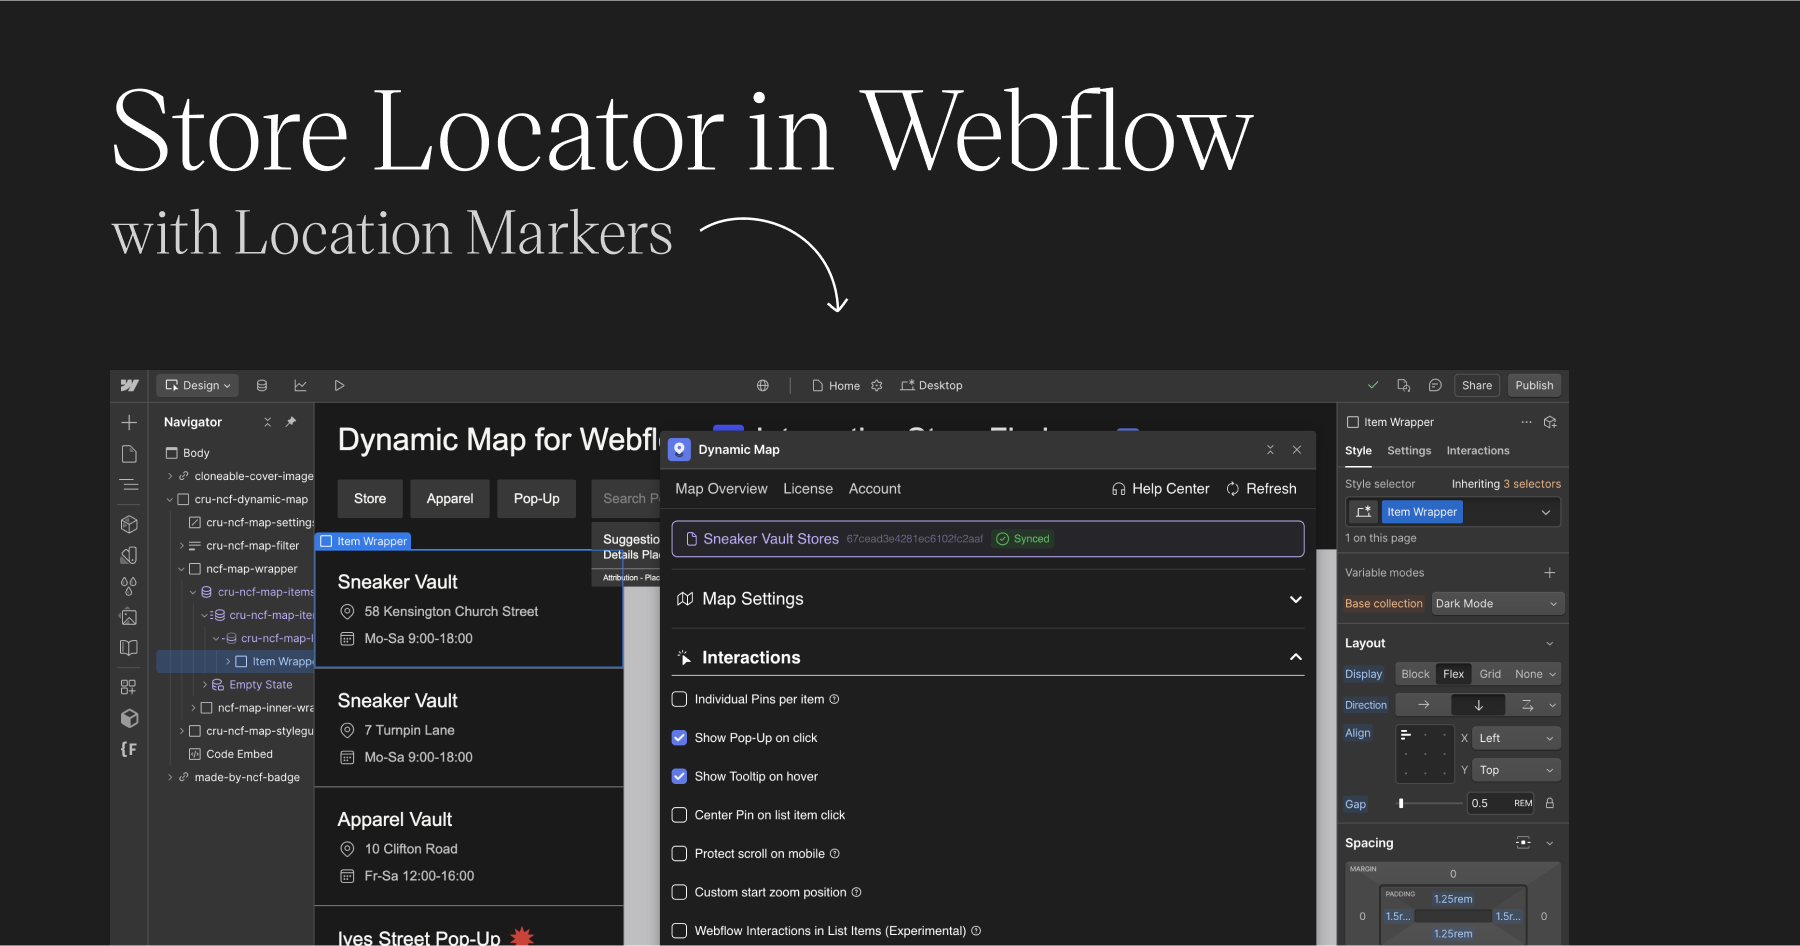
5 Configure your map’s settings
Modify your map’s settings such as custom marker types, tooltips and media-rich pop-ups as well as live filters and address search

6 Style your map using Webflow’s Designer
With Dynamic Map for Webflow all of your map’s elements can be styled directly in Webflow’s designer
Real-World Use Cases – Dynamic Map’s cloneables
See how various industries apply dynamic, CMS-driven maps to tackle real-world challenges and enhance user experiences:

Property Listings for Real Estate Cloneable
An accommodation platform displays vacation rentals and listings across several neighborhoods, complete with booking functionality—similar to what you’d find on Airbnb.

Interactive City Travel Guide Cloneable
A comprehensive travel guide helping tourists discover attractions, landmarks, and experiences across different neighborhoods in Berlin.

Retail Store Locator Cloneable
A nationwide retail brand uses a map to help users find the nearest store, view opening hours, and access contact details for a smooth shopping journey.
Dynamic Map for Webflow enables you to integrate Mapbox with Webflow CMS, allowing you to add advanced features like pop-ups, custom filters and more – without any custom code.
Other Tutorials on creating interactive Maps with Webflow
How to create a Store Locator in Webflow
How to use Google Maps in Webflow
Common questions on integrating Mapbox with Webflow
Does Webflow support Mapbox natively?
No. Webflow's native map element only supports Google Maps. To use Mapbox in a Webflow project, you need the Dynamic Map App. It adds full Mapbox support — including CMS-connected pins, custom Mapbox styles, filtering, and pop-ups — without requiring any custom code.
How do I connect Mapbox to my Webflow CMS?
Install the Dynamic Map App from Webflow's Marketplace, connect your CMS collection, and select Mapbox as your map provider in the app settings. Paste your Mapbox access token (from your mapbox.com dashboard) and your CMS items automatically appear as location pins on the Mapbox map.
What is a Mapbox access token and how do I get one?
A Mapbox access token is the authentication key that allows your Webflow site to load Mapbox maps. Create a free account at mapbox.com, navigate to your account dashboard, and copy the default public token. You can also create a scoped token and restrict it to your domain for security.
Is Mapbox free to use with Webflow?
Mapbox has a generous free tier that includes 50,000 map loads per month — enough for most Webflow projects. Usage above the free tier is billed based on map loads. The Dynamic Map App itself is free to use on Webflow staging domains; the Live Domain plan starts at $19 per month per domain.
What are the advantages of Mapbox over Google Maps for Webflow?
Mapbox offers three key advantages over Google Maps in Webflow:
(1) Use the address search feature in Dynamic Map, which is exclusively available to Mapbox users.
(2) Complete visual control — you can fully customise map styles including colors, typography, and layer visibility using Mapbox Studio or custom style URLs.
(3) Better performance — Mapbox uses vector tiles that load faster and scale more smoothly.
Can I use custom Mapbox map styles in Webflow?
Yes. Dynamic Map supports any Mapbox style URL — including custom styles created in Mapbox Studio, dark mode themes, satellite views, and branded map styles. Paste your Mapbox style URL into the Dynamic Map App settings and your Webflow map will render with that custom style instantly.
When should I choose Mapbox over Google Maps in Dynamic Map?
Choose Mapbox when your project requires: a custom visual map style that matches your brand, better performance on map-heavy pages, or a more cost-predictable solution for high-traffic sites. Choose Google Maps when your visitors expect the familiar Google Maps interface, or when you need Google's specific features like Satellite or Terrain View. Dynamic Map supports both — you can switch map providers at any time without rebuilding your map.