
.avif)
Introduction to using Google Maps with Webflow CMS
Creating an interactive Google Maps integration for your Webflow site can significantly enhance your project's user experience – whether you’re managing a restaurant chain, running a real estate agency, or offering travel guides or store locators.
While Webflow includes a built-in Google Maps element, its limitations can restrict your project’s functionality.
In this complete guide, we’ll cover everything you need to know—from using Webflow’s native Google Maps element to building dynamic, CMS-driven maps that truly support your business goals using Dynamic Map for Webflow.
What You’ll Learn:
- How to set up Webflow’s native Google Maps integration, step-by-step
- The three major limitations of Webflow’s Google Maps element that could impact your project
- When to use Webflow’s built-in Maps element vs. when to opt for Dynamic Map for Webflow
- How to build a scalable, CMS-connected Google Maps integration using the Dynamic Map App
How to use Webflow's Default Google Maps Element

Webflow’s built-in map element offers a simple way to embed Google Maps directly into your website. Powered by the Google Maps JavaScript API, it delivers basic functionality that’s ideal for straightforward, single-location use cases.
What Webflow’s default Google Maps element offers:
- Interactive Google Maps integration with one location
- Four map types: roadmap, terrain, satellite, and hybrid
- Basic zoom and pan controls
- Address-based location input
Step-by-Step Webflow Google Maps Setup Guide
Let's walk through setting up a basic map useful for a simple contact page using Webflow's default Google Maps element. This foundation will help you understand both the process and the limitations we'll address later. A full video by Webflow themselves can be found here.

Step 1: Add the Google Maps Element to Your Webflow Project
- Open your Webflow project in the Designer
- Navigate to the Add Panel (+ icon or press A)
- Scroll to the "Advanced" section
- Drag the Map element onto your page
- Position and size the map container
Step 2: Create Your Google Maps API Key
- Visit the Google Cloud Console at console.cloud.google.com
- Create a new project or select an existing one
- Enable the Maps JavaScript API in the API Library
- Create credentials and generate your API key
- Set up billing (Google requires a credit card, but offers $200 monthly free usage)
- Restrict your API key to your domain for security
Check out our API Key set up video guide

Step 3: Insert Your Google Maps API Key into Webflow
- Navigate to Project Settings → Apps & Integrations
- Find the Google Maps section
- Paste your API key into the JavaScript API Key field
- Save and publish your site

Step 4: Set Your Map Location and Behavior
- Enter your address in the location field
- Choose your map type (roadmap, satellite, terrain, or hybrid)
- Configure interaction settings

Congratulations! You now have a working default Google Maps embed on your Webflow site.
The Three Critical Limitations of Webflow's default Google Maps element
While Webflow's native Google Maps element works fine for basic use cases, they have three fundamental limitations that make them unsuitable for most business applications:
Limitation #1: Only Single Location Support
The Problem: Webflow's Map element can only display one location pin at a time. You can add multiple Map elements to a page, but each requires manual configuration and creates multiple separate map instances.
Limitation #2: No CMS Connection
The Problem: Webflow's native Google Maps element has no integration with CMS Collections. Every location must be manually entered into individual Map elements, and there's no way to dynamically populate maps from your CMS data.
Limitation #3: Severely Limited Styling and Customization
The Problem: Native Webflow maps offer only minimal customization options. You're stuck with Google's default map styling, standard markers, and no interactions such as pop-up windows or tooltips.
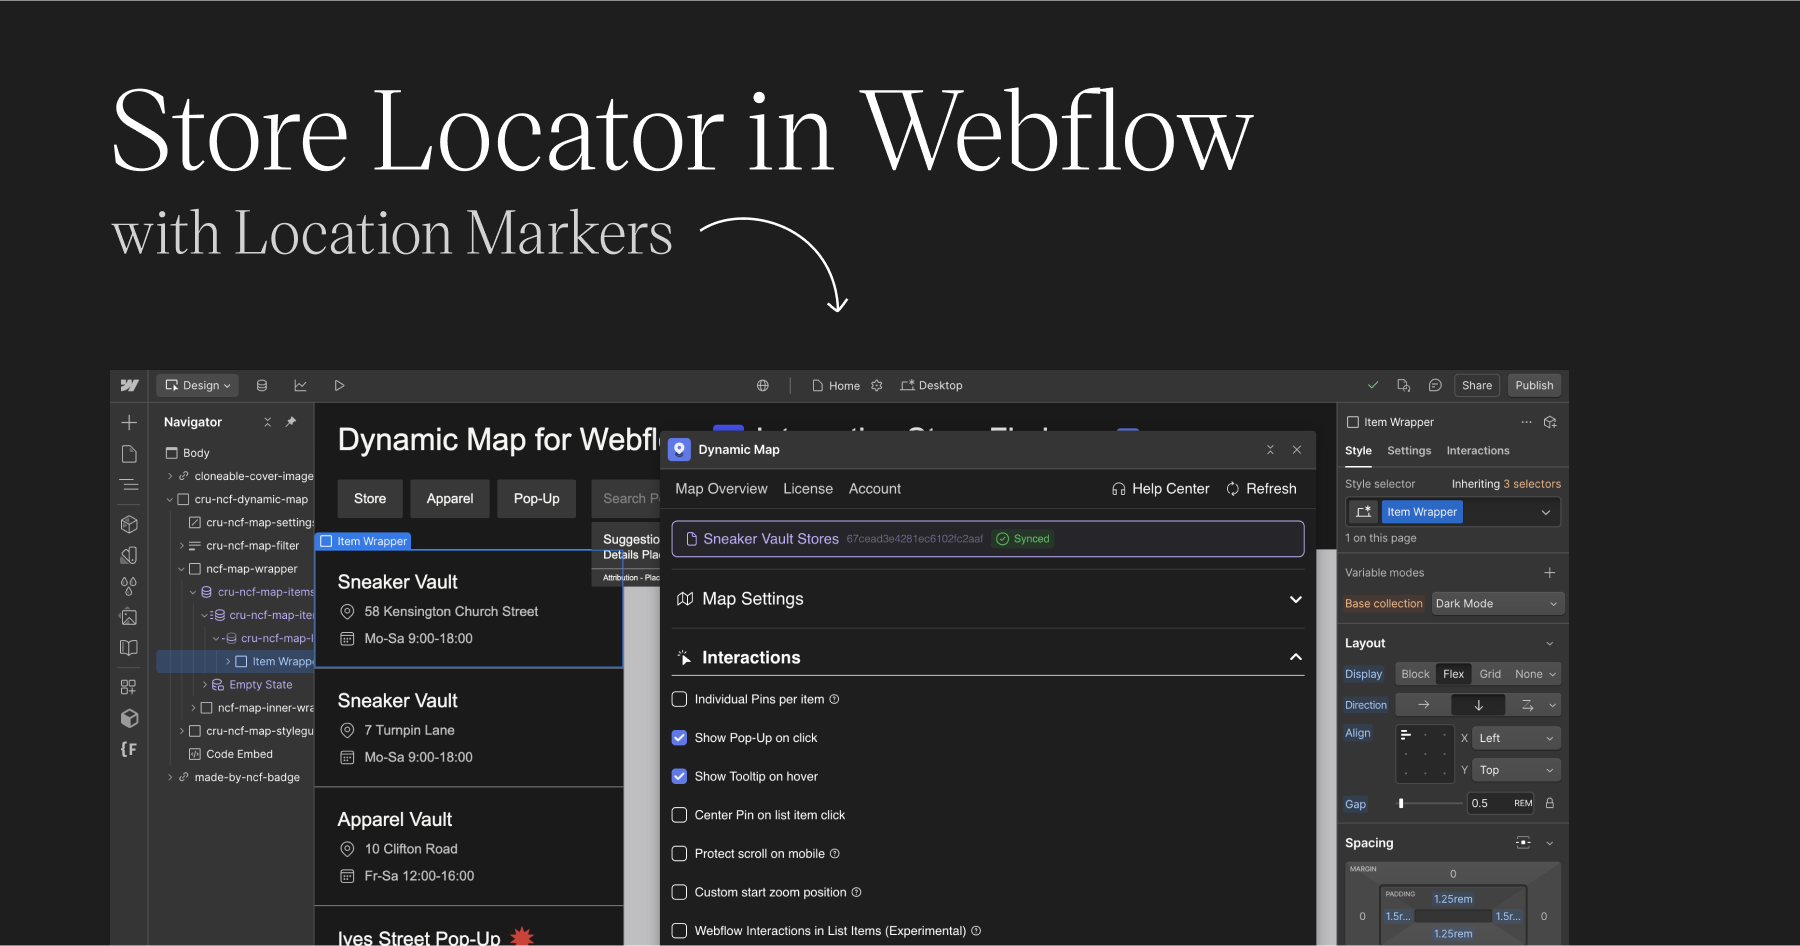
Creating Dynamic CMS Maps with Google Maps in Webflow using Dynamic Map App


Dynamic Map is a native Webflow App that enables you to create interactive CMS maps with location markers, pop-ups, complex filters and much more. Instead of fighting against Webflow's limitations, you get a purpose-built solution that works for more complex Google Maps implementations in Webflow.
Main Features of Dynamic Map for Webflow
Multiple Locations from CMS Collections:
- Connect directly to your Webflow CMS
- Display unlimited pins from your collection items
- Automatic updates when you add/edit CMS entries
- Real-time synchronization between your CMS and map
Advanced Customization:
- Custom map styling that matches your brand
- Branded marker icons and pin designs
- Rich pop-up content with images, links, and formatted text
- Multiple map themes and color schemes (with Google Maps and Mapbox)
Interactive Features:
- Location filtering and search
- Unlimited items
- Custom zoom levels and map boundaries
- Mobile-optimized touch interactions
How Dynamic Map Integrates with Webflow
Dynamic Map works as a native Webflow app, meaning it integrates seamlessly with your existing workflow. In this detailed walkthrough you're going to learn, how to implement an interactive CMS map using Google Maps on your Webflow site in 6 steps:

1. Set up your CMS Collection List
Include text fields for the item’s name, latitude and and longitude fields

2 Install Dynamic Map App from Webflow’s App Marketplace
Just browse Webflow's Marketplace or open from the App Panel in Webflow's designer

3 Connect your CMS collection list and create map
Select the collection list containing your location data

4 Switch to Google Maps as your map provider and insert your API key
Learn where to get your Google API key in this video guide

5 Configure your map’s settings
Modify your map’s settings such as custom marker types, tooltips and media-rich pop-ups as well as live filters and address search

6 Style your map using Webflow’s Designer
With Dynamic Map for Webflow all of your map’s elements can be styled directly in Webflow’s designer
Dynamic Map for Webflow includes enterprise-grade features that go far beyond Webflow’s default Google Maps element. Want to learn more about Dynamic Map for Webflow?
Real-World Use Cases – Dynamic Map’s cloneables
Let's explore how different industries leverage dynamic CMS maps to solve specific business challenges.

Real Estate Property Map
An accommodation booking platform showcasing vacation rentals and properties across multiple neighborhoods with integrated booking functionality, inspired by platforms like Airbnb.

Interactive Travel Guide
A comprehensive travel guide helping tourists discover attractions, landmarks, and experiences across different neighborhoods in Berlin.

Multi Store Locator
A retail chain with multiple store locations needs customers to easily find nearby stores, check hours, and access contact information for optimal shopping experiences.
When to Use Webflow's Built-in Google Maps vs. Dynamic Map for Webflow
Webflow includes a native Google Maps element suited for simple, single-location embeds — such as showing your office address on a contact page. It requires no additional tools, but it cannot connect to your CMS, cannot display multiple locations, and offers no filtering, address search, or custom pop-ups.
Dynamic Map for Webflow is the right choice whenever your map needs to be data-driven. If your locations live in a Webflow CMS collection, if you need multiple pins on one map, or if your visitors need to search, filter, or click pins to see details — Dynamic Map handles all of this natively inside Webflow Designer, with no custom code required.
The decision is straightforward: use Webflow's native Google Maps element for a single static location. Use Dynamic Map for any CMS-connected, multi-location, or interactive map use case.
Other Tutorials on creating interactive Maps with Webflow
How to Integrate Mapbox with Webflow
How to create a Store Locator in Webflow
Common questions on integrating Google Maps with Webflow
Does Webflow have built-in Google Maps support?
Yes. Webflow includes a native Google Maps element that lets you embed a Google Map with a single pinned address. It requires a Google Maps API key and supports four map types: roadmap, terrain, satellite, and hybrid. However, it is limited to one location at a time and has no CMS connection, which makes it unsuitable for multi-location or data-driven map use cases.
How do I connect Google Maps to my Webflow CMS?
Webflow's native Google Maps element cannot connect to the CMS. Each location must be entered manually. To connect Google Maps to a Webflow CMS collection, you need the Dynamic Map App. Install it from Webflow's Marketplace, connect your CMS collection, select Google Maps as the map provider, and insert your Google Maps API key. Your CMS items automatically appear as location pins.
Do I need a Google Maps API key to use Google Maps in Webflow?
Yes. Both Webflow's native Google Maps element and the Dynamic Map App require a Google Maps JavaScript API key. You create the key in Google Cloud Console. Google provides $200 of monthly free usage, which covers most small to medium projects. You should restrict your API key to your domain for security.
What are the limitations of Webflow's built-in Google Maps element?
Webflow's native Google Maps element has three main limitations:
(1) It only supports a single location. There is no way to display multiple CMS-driven pins on one map.
(2) It has no CMS connection. Every location must be manually entered rather than pulled from a collection.
(3) It offers minimal styling and customization. No custom markers, pop-ups, tooltips, or filter interactions.
Can I add multiple map pins from my Webflow CMS collection using Google Maps?
Yes, but not with Webflow's native Google Maps element. It only supports a single pinned location. To display multiple CMS items as individual map pins on Google Maps, you need the Dynamic Map App. It connects directly to your CMS collection and renders each item as a pin with full filtering, pop-up, and styling support.
When should I use Webflow's native Google Maps vs. Dynamic Map?
Use Webflow's native Google Maps element when you need a simple, single-location embed. For example, showing your office address on a contact page. Use Dynamic Map when you need multiple CMS-connected pins, real-time filtering, address search, custom markers, pop-ups with CMS content, or any level of map interactivity. Dynamic Map works with both Google Maps and Mapbox or even Open Source alternatives and requires no custom code.